12 Unique and Budget Friendly Garden Inspired Ideas
Welcome to the third Fabulous Friday Link Party Blog Hop.
The Fabulous Friday Link Party is where bloggers share some of their favorite blog posts every Friday. You can find so much inspiration each week including home decor ideas, recipes, DIY’s, gardening tips/ideas, and so much more!
Quarterly, the Link Party hosts each invite a talented blogger who links up regularly to join us in a special Blog Hop.
For this blog hop, we are sharing garden ideas, inspiration and how to’s.
Follow along to see 12 wonderful gardening related ideas.
All the links to the Hosts and their Featured Blogger Friends are at the end of this blog post.

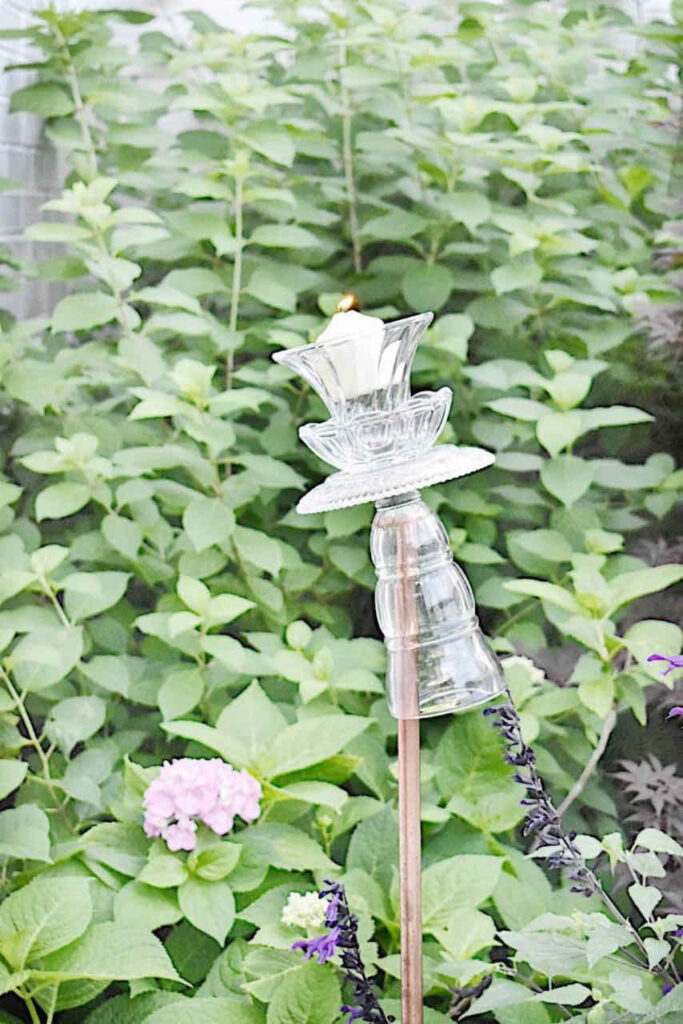
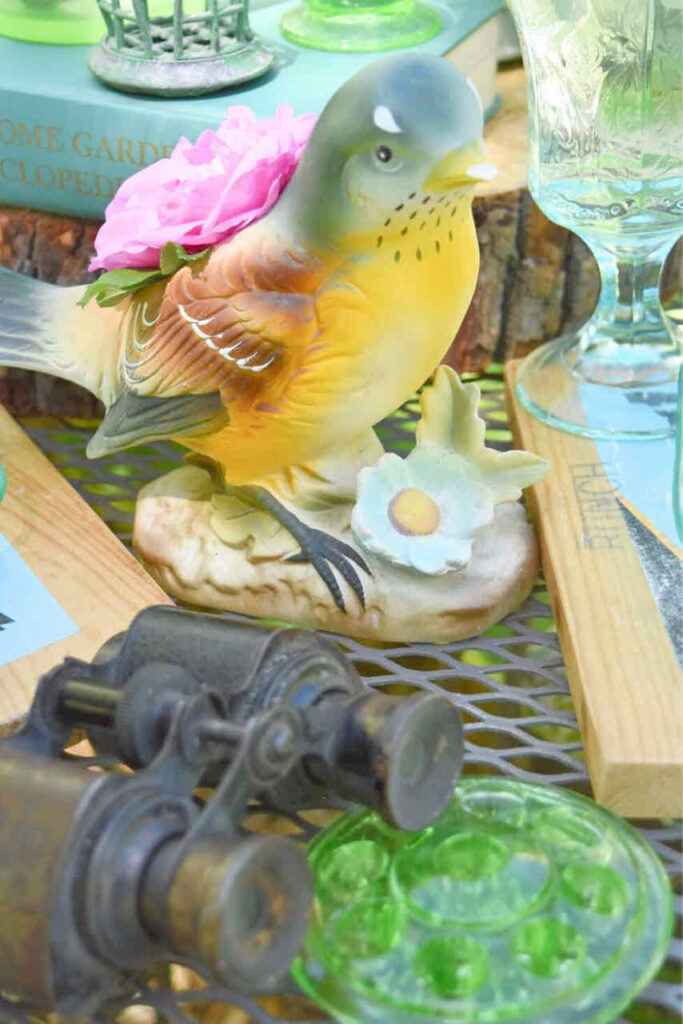
unique garden ornament DIY
I love to add ornaments and decorative things to my garden and flower beds.
Sometimes I use vintage sculpture and architectural pieces, which are great, but I want to share how to make a unique thrifted garden ornament.
These ornaments are easy and very inexpensive and add so much character to your gardens.
As most of you know, I love thrifting, so it was fun to scour the thrift stores and be creative with pieces to make my garden ornaments.
For the base piece, you can use a flower vase, like the ones from the florist.
These are usually very easy to find at thrift stores and garage sales or you may already have one.
It needs to be at least 7-8″ tall because your pole/rod will slide up through this to hold your garden ornament.
supplies for a thrifted garden ornament

For this project you will need the flower vase and then 2-3 other pieces, and some type of adhesive to hold glass.
You can use Liquid Nails, but get the clear kind if you are using clear glass pieces for your ornament, otherwise the white adhesive will show.
You can also use E600 glue.
For this particular ornament, I used a parfait glass instead of a flower vase. This will work just fine because it is about 8″ tall.
Next, I used a small clear salad plate, a small clear glass bowl, and a candle holder.
Most of these pieces are $1-$2, so this is a very inexpensive project.
directions for making a thrifted garden ornament

First, you will add a generous amount of adhesive to the bottom of the vase, then attach the salad plate.


I turned the salad plate upside down and the next layer, the small bowl, I attached right side up.
No particular reason for this, it just added a little more interest by alternating them.

The final layer was attaching the candleholder to the top.
Be sure and add a generous amount of adhesive to each piece before you attach them.
You will need to let them sit for several hours so the adhesive will dry really well.
The fun thing about using a small candleholder for the top piece is that you could actually put a votive candle in it.
If you’re entertaining outdoors, you could light the candle for a little outdoor ambiance.
Another option would be a small bouquet of flowers.
Wouldn’t that be sweet to have several of these ornaments filled with flowers or candles for an outdoor garden party??

This particular ornament is one I made years ago.
For this one, I only used 3 pieces. A vase, small glass bowl (turned right side up) and a candleholder on top.
For the rode/pole, I typically use copper pipe. You can find this at most improvement stores, like Home Depot and Lowe’s.
I actually found a piece of pipe that had a twisted/spiral look to it, at a flea market, so I used that for one of my ornaments (shown in the pic right below).
You can use any type of pole, rod or pipe, as long as it is sturdy and can withstand the weather outside.
If you don’t have a garden or much yard space, you could always use them in a potted plant. Just cut the pole down to be a height in proportion to the pot size.

Wouldn’t it be cute to make several of these to use along a walkway for an evening dinner party, or even a wedding?
Add votive candles to them, and voile’, you have instant ambience.
Your guests will be very impressed and feel welcomed.
Just use whatever thrifted pieces you like, and be creative!
If you try your own garden ornament DIY, I would love to hear about it.
blessings,

Click on any photo below to see all of my friends garden ideas and inspiration…
If you enjoyed this post, Pin It to remember it….

And be sure and subscribe so you don’t miss a thing!!
So cute! I love the idea of lining a patio or walkway with them! Come on thrift stores… OPEN! OPEN! lol
Tania
I know!! So ready for thrifting and estate sale shopping! Thanks for following along with the blog!
I love this so much, I can’t wait to make one!
It would look so cute in your garden!
I love this project, especially how you can put it over the pole…very clever! Thanks for sharing! Pinning!
Oh, good! Glad you enjoyed it! It’s really fun to keep an eye out for unique pieces to use to make them. Have a great day!!
Adorable!!! How thrifty and creative is this!! So good, Michele!!
Oh, thanks so much Rachel! So glad you liked it. Have a wonderful weekend!
Michele,
This is such a cute idea. I’d like to feature it on my Sunday, Dirt Road Adventures.
Oh, good Rachel! So glad you liked it, and I would love that!
This is such a clever and pretty idea.
Pinned!
Thanks so much Cindy! It’s really fun to make and makes a great gift for a gardener friend. Happy weekend!
What a cute idea! I’m definitely going to do this.
Oh, good! It’s such a fun addition to the garden and makes a great gift for gardening friends.
Michele, I enjoyed this post so much and I wanted you to know that this post will be featured on Tuesday Turn About Link Party this week! Pinned to our Tuesday Turn About Pinterest board.😊 Thanks for sharing your project and I hope to see you at the party this week! 😊
Oh, that’s great news Cindy! Thanks so much for featuring my post!
So cute Michele! Love it all the clear glass. And the idea of lining a walkway — fab!
Thanks Diane! They are a fun gift for a gardening friend too.
Cute! I’d love to see some of the other creative or vintage items you have decorating your garden!
So glad you enjoyed the project/post. I love getting suggestions, so I will definitely try and share more garden projects. I need to show the tomato cages I made from vintage fencing.
Very cute garden project! It looks happy!
The bottom glass piece is not a vase though. It’s an old soda glass!
Either way, it’s nice to repurpose it!
Fun idea!
Yes, I mentioned in the post that one of the ornaments I showed was an old parfait glass. The other one was a vase from the florist. So glad you liked it.
I love this idea Michele! The vintage glass looks perfect for this. Next time I’m thrifting I’ll be looking for a few pieces to be able to make this. Thank you for sharing!
So glad you enjoyed it Susan! It’s really fun to be on the hunt for unusual pieces to use.
Oh my goodness I love this project and it would be so perfect for my daughter’s garden style wedding! Thank you for sharing!
Oh my goodness! It would be SO perfect for a wedding! I would love to hear if you try it.
I love lawn ornaments, so glad you shared this one Michele. I need to get out and go thrifting so I can create one for our flower beds. I love the idea of lining a walkway with them. Clever and thrifty, my two favorite things! Can’t wait to get started on one.
Oh good! I’m so glad you enjoyed the post, and I would love to see if you create one of your own!
Such a cute project Michele, I love how you added the cup to the top for the candle, or you could add birdseed.
Oh, I love the birdseed idea Wendy! I think these would be a fun gift for a gardener friend.
Hi Michele! This is such a fun DIY and a lovely way to add interest to any garden or outdoor entertaining space! I’ll be looking for glass items next time I go thrifting! Happy Day!
So glad you liked it Donna! It’s really fun to go on the hunt for things to use.
Really creative Michele!! I love adding vintage things into my gardens
These are so pretty, Michelle! I’ve got a turned metal rod around here; think it was a floor lamp. Now I know how to use it! Great repurpose!
Michele – You always come up with the most creative ideas – that look amazing – for the cost of a song. You have a true gift. I imagine that making a number of these would create a very magical environment in your garden on a summer evening. Thanks for the tutorial. Also thank you for including me on your Fabulous Friday Blog Hop. I feel honored.
What a cute idea! You are so creative Michele!