Let’s Create a Festive and Fun Halloween Snack Board
Don’t you just love a good charcuterie board or snack board?? Let’s create a festive and fun Halloween snack board just in time for your Halloween parties.
I love getting creative and thinking outside the box when I am putting together a themed snack board, cheese board or a charcuterie board!

This post contains affiliate links which means if you purchase something, I make a small commission at no additional cost to you. Thank you for supporting my blog. You can read my full disclosure here.
The thought of Halloween being right around the corner made me start thinking of a fun Halloween snack board idea.
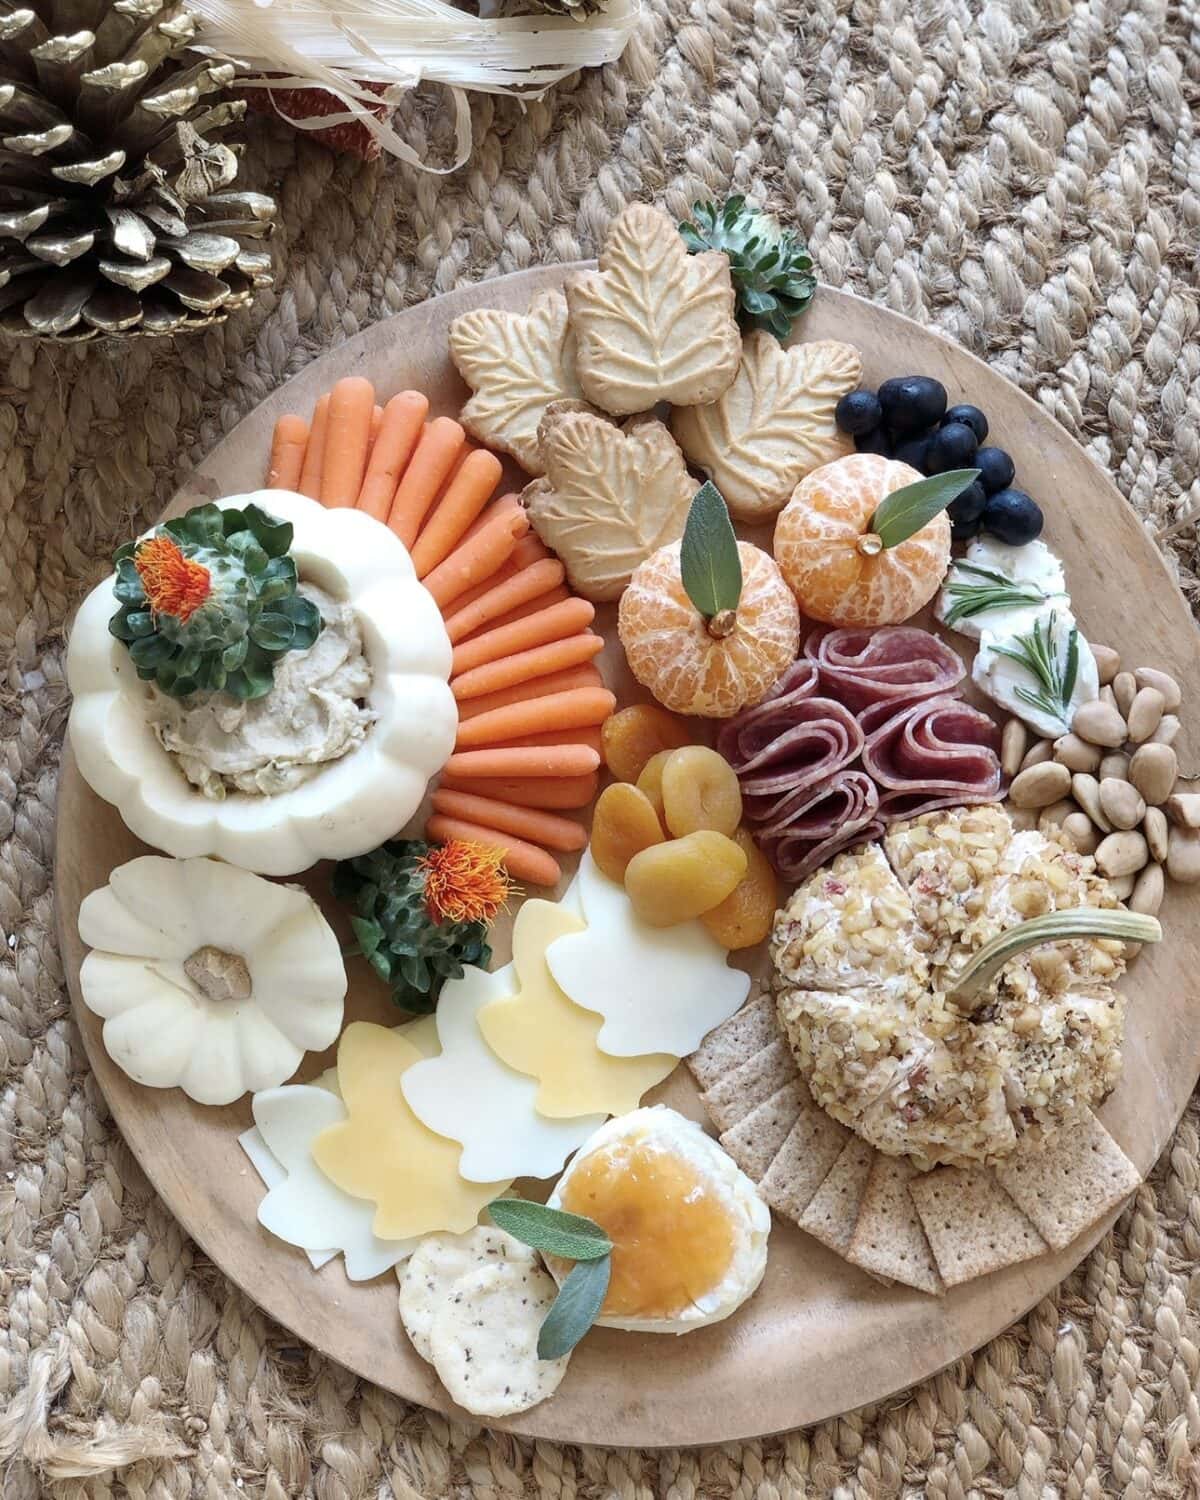
Last year, I created this fall themed board that is really cute if you want a fall theme and not just a Halloween board.
I have enjoyed creating traditional charcuterie boards for quite a while, but in the past year discovered that I love making a seasonal or themed board.
what is a charcuterie board?
The term “charcuterie” refers to the preparing of meats, like prosciutto, salami, etc.
More recently when people say “charcuterie board”, they are referring to a fun meat and cheese board that usually includes cured meats, cheeses, crackers, nuts, fruits, veggies and even candies.
A charcuterie board is sometimes also referred to as a “snack board” or a “grazing board”.
what should go on a snack board?
Here are a few ideas of what to put on a charcuterie or snack board:
cured meats
a variety of cheeses
olives
nuts
fresh fruit
dried fruits
fresh veggies
hummus
crackers or small bread slices
jelly, jam or a dipping sauce
and you can even add a few sweet items to the board, if you like.
what do you put on a snack board first?
The first thing to put on your board is the larger items, such as a wheel of cheese or small bowls to serve things in.
For example, on this Valentine charcuterie board, I used several small white bowls and a heart shaped Valentine candy box.

Arrange the items evenly around your board.
After you have placed those anchor pieces, you will then place cheeses and meats.
When you have your main items placed on your board, you can begin filling in with smaller items, like nuts, dried fruits, olives, etc.
what can I use to put my charcuterie or snack board on?
A large cutting board, a large platter or even a cookie sheet would work great to make your charcuterie or snack board.
If you are only entertaining a small group of friends, you could even use smaller boards.
Another fun thing to do is use small individual boards so each guest has their own snack board.
what do I put on a Halloween snack board?
Look for things that are festive for the season or the colors of the season. For example, for Halloween you would look for orange, white or black foods or Halloween shapes.
Here is an example of a black and white board I did for New Year’s Eve a few years ago.

Halloween cookies would be a fun addition, or if you live in an area where there is a Trader Joe’s grocery store, they have all sorts of fun seasonal foods including leaf shape tortilla chips, and maple leaf shaped cookies.
Halloween oreos, gummy worms, candy eyeballs are a few other fun ideas for a “spooky season” board.
Also, banana ghosts are really cute for a Halloween-themed snack board. Cut a banana in half and add mini chocolate chips for eyes.
You can also add a few non edible things to finish off your board.
Plastic spiders, a small skeleton, a skeleton hand or even mini pumpkins are great options.
Another fun idea is to cut shapes with cookie cutters out of meats and cheeses. You can cut bat shapes, pumpkin shapes, etc. to use on your festive Halloween charcuterie board.
This yummy fall snack mix would be great for a fall or Halloween theme board also.

orange and black foods (and neutrals) to use for Halloween charcuterie board
Orange:
carrots
dried apricots
candy corn
candy pumpkins
peach or apricot jam
orange cheeses, like cheddar cheese or American
pimento cheese
cantaloupe
mandarin oranges
White or light color:
cauliflower
popcorn
hummus
white cheeses
pear or apple slices, peeled
banana slices
crackers
breads
white chocolate
mini marshmallows
Black or dark color:
black olives or greek kalamata olives
dark grapes
blueberries
blackberries
raisins
chocolate chips
chocolate-covered pretzels, or almonds
dark blue corn tortilla chips
options for healthy snacks for your board
If you are looking for a healthier option for your board, here are a few ideas…
fresh veggies like carrots, cauliflower, broccoli, cucumber, and celery sticks
fresh fruits
veggie chips
dried fruits
whole grain crackers
yogurt
nuts
peanut butter
turkey deli meat
string cheese
hummus
trail mix
a festive and fun Halloween snack board


For this Halloween themed board, I started with a large wooden rectangle cutting board.
I cut a spider web out of waxed paper to lay on top of my board and let hang over the sides.
how to make a spider web out of waxed paper
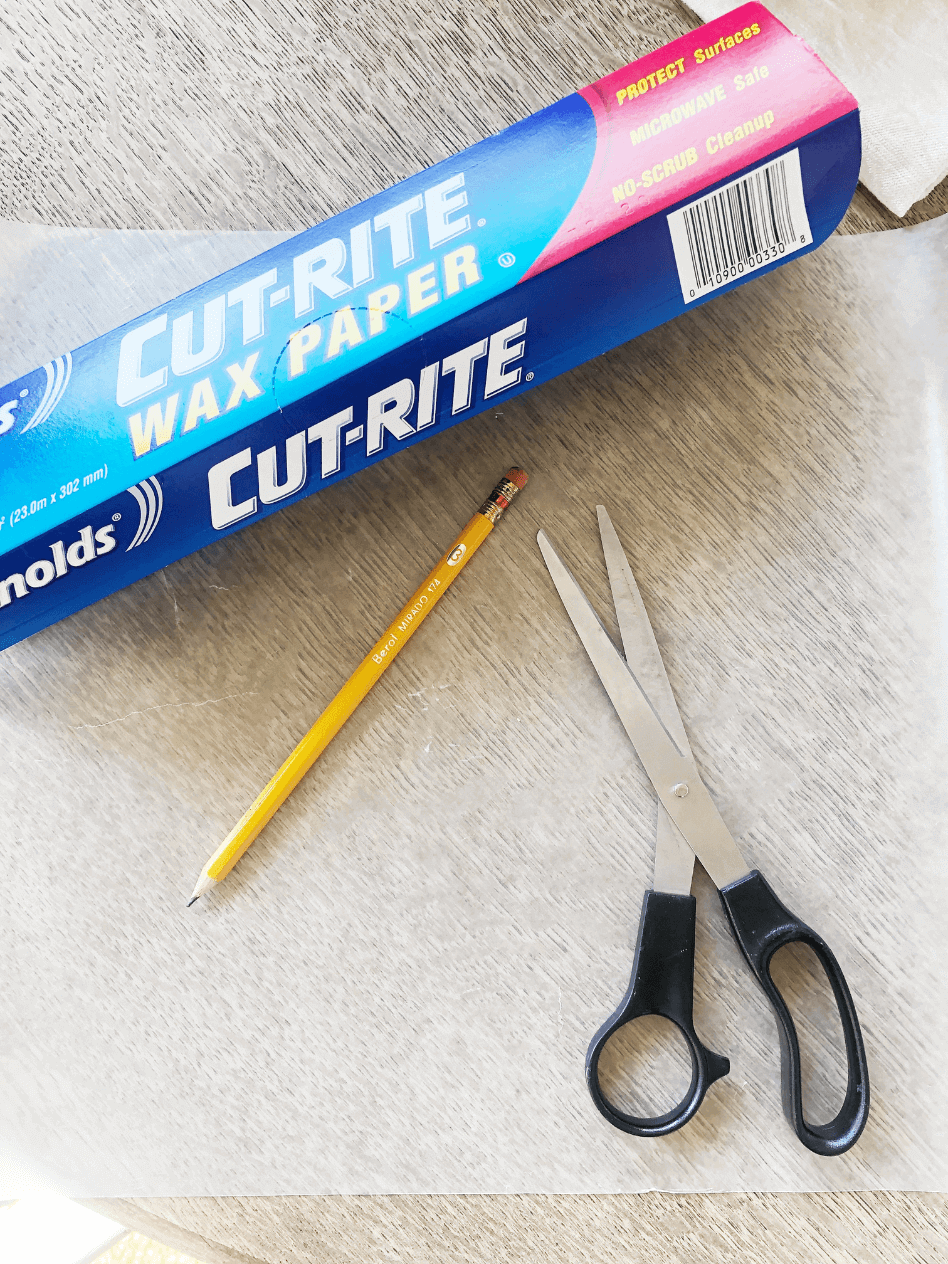


To create a spider web out of paper, cut a square of paper then fold in half diagonally.
Cut off excess paper, and fold the triangle shape in half again. Fold in half one more time.


Fold your paper to look like the photo on left, then cut off excess at the top.
Freehand lines like the photo on the right.


Cut out the shapes you drew being careful not to cut all the way through to the other side.
Next, carefully open up your web.
I placed mine between 2 dishtowels and quickly ironed with a warm iron to remove the creases.
Be sure you don’t use a really hot iron because it will melt the waxed paper.
assembling my Halloween board
I placed my spider web on the board then started with my larger items first, which was 2 small plastic cauldrons used as bowls and a white mini pumpkin.
Next, I laid round crackers and pepperoni pieces down the center of my board and put a small plastic skeleton on top.

Then, I begin filling in with the other things I wanted to use on my board, and arranged them until I had the look I wanted.
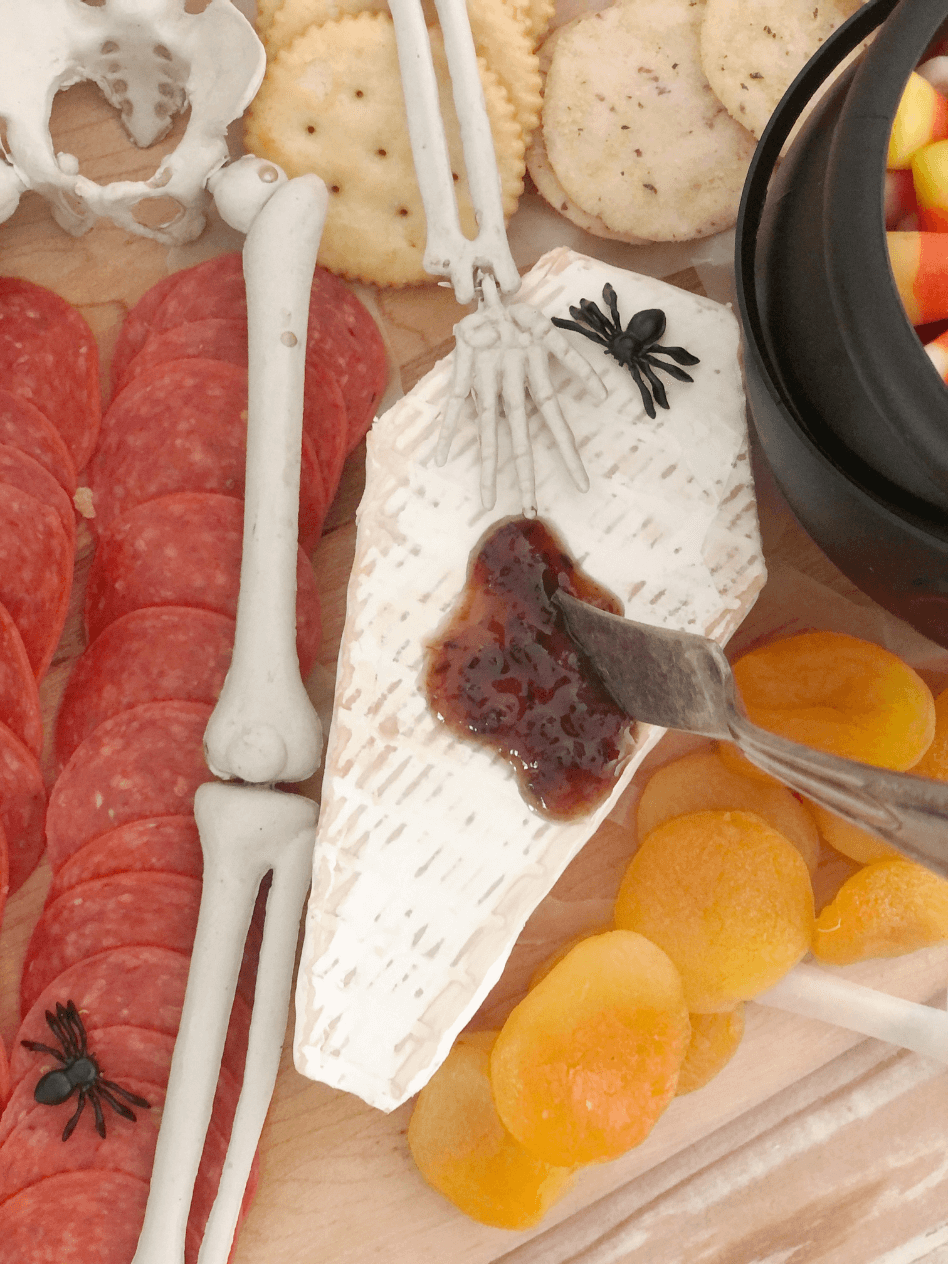

I added brie cheese cut into a tomb shape with a bit of raspberry chipotle jam and a knife sticking out the top.
Peeled mandarin oranges with pretzel sticks as a stem and mint leaf resemble pumpkins.


I used cookie cutters to cut “BOO” letters out of mozzarella cheese slices, then laid them on top of gouda cheese slices. The difference in the colors of cheese helped the word stand out.
Large pimento stuffed olives standing on their end, resemble eyeballs.
I filled in any empty space with blueberries, dried apricots, and small crackers.
The cauldron bowls were filled with candy corn and pimento cheese. I used a sandwich bag and cut the corner off, filled with greek yogurt and piped the look of a spider web on top of the pimento cheese.


The witches hat on top of the white mini pumpkin was made from a Ritz cracker and an ice cream cone. I cut the cone down to be shorter and dipped it in peanut butter so it would stick to the cracker.
The little witches broom was part of a napkin ring I’ve had for a while but I’m sure there are similar things at the craft store in the Halloween decor this time of year.
Lastly, I sprinkled tiny plastic spiders around the board to complete my “spooky” Halloween board.
I hope you enjoyed seeing how to create a festive and fun Halloween snack board and found some inspiration to create your own.
It is the perfect addition to any Halloween party and will be the talk of your party guests.
Sign up to receive my email so you don’t miss ideas and inspiration for the holidays.
blessings and happy halloween,
Be sure and Pin it to Remember it…..

shop the post

Super cute idea. I’m going to share it on my Saturday post. Hugs to you.
Oh, thanks so much friend! I really appreciate that, and I’m so glad you liked it!
Such a cute idea Michele!! Loved the cheese cut in the shape of a tomb! Haha Susan
Thank you Susan! It was a fun one to put together!
I usually don’t comment but I must say this is so creative, fun and down right adorable! Thanks for your lovely posts.
Oh, thank you so much! I really appreciate the kind words and I’m so glad you liked it!
Michele,
This is so cute. I’m sharing a link on Sunday.
Aww, thanks so much Rachel! I’m so glad you liked it and I really appreciate the share!
Omgoodness this is adorable Michele! Sharing it in my weekly round-up tomorrow!
Oh, thanks so much Cindy! I really appreciate that and I’m so glad you like it!
This is so adorable Michele, I have a project I need to create and you gave me a lot of inspiration.
Oh, I’m so glad you liked it and found some inspiration Wendy!
What a great charcuterie board! Thank you for sharing on Whimsy Home Wednesday Link Party!
Of course! And thanks so much for the kind words!
This snack board looks so delicious! I love it!
Oh, I’m so glad you liked it!! Thanks so much!
Thanks so much for sharing my Halloween snack board! I really appreciate that!
This is one of the best ones I’ve seen! Thanks so much for sharing!!
Oh, thanks so much! I’m so glad you liked it.
So cute Michele! Now I am hungry! I love your wine pumpkin too! So smart!
Thanks so much Amy! I’m so glad you like it.
So cute Michele! love the spider webs out of the waxed paper.
Thanks so much Wendy!
I absolutely LOVE your snack board! It’s elegant but still has so many fun and spooky elements! (I read your blog often, but it’s my first time commenting.) Thanks so much for the fun ideas!
I am so glad you like the snack board and thank you so much for commenting!!
So many adorable boards!!! Thank you for all the great ideas.
Thanks so much! So glad you like them.