How to Style a Kitchen Hutch
I recently did a little refresh in my kitchen and wanted to share how to style a kitchen hutch using pieces I already had.
Do you sometimes just feel the need for a change? Yeah, me too!
But sometimes changing out my decor is difficult for me, if I love how something is already styled.

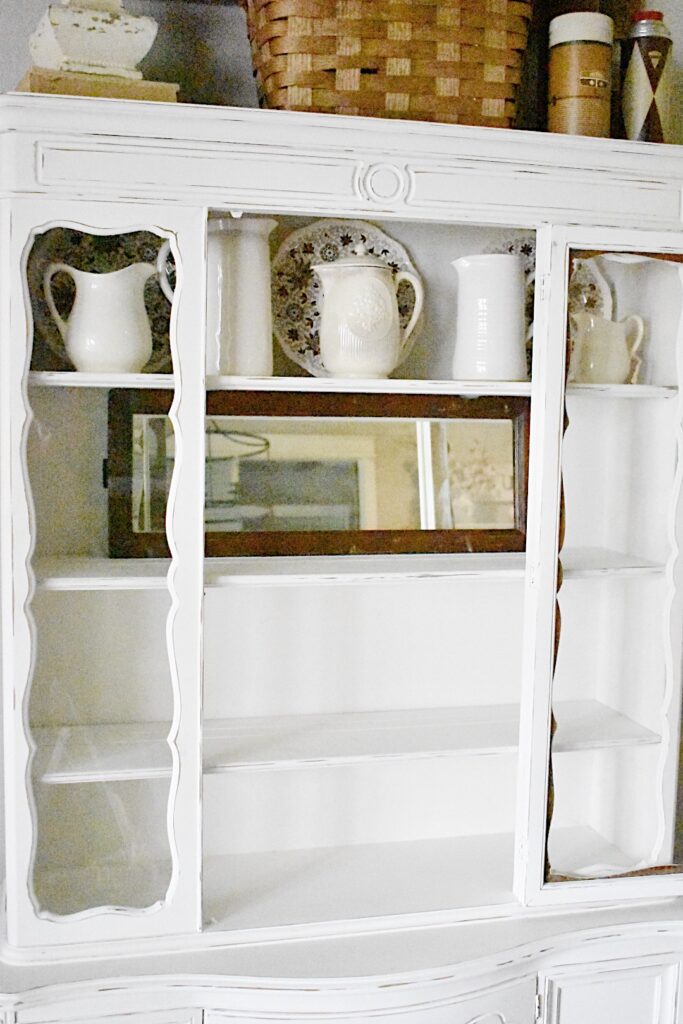
That was the case with my china hutch. It was styled with some of my favorite white ironstone pieces, and I really loved it, but was just feeling like I might want something different for a while.
Also, I have a beautiful collection of brown transferware and I thought this would be a great place to display it.
I have been collecting the transferware for quite some time, but I have linked some great pieces at the bottom of the post if you are interested in finding some for yourself.
how I started

I began by taking everything out of the hutch. I decided it would be easier to start from scratch than try to restyle what was already there. This way I had a blank slate and fresh eyes.
I gathered all of the brown transferware pieces I thought I might want displayed, and pulled out a few of my white ironstone pitchers to mix in. This way all of the pieces and patterns didn’t look exactly the same, since I’m not a fan of everything matching.
shelf one
For the most part, I styled one shelf at a time. I added layers for interest, and at the end, when all the shelves were done, I tweaked it all a bit.
For example, on this top shelf, I put 5 of my creamware pitchers along the top. I staggered the sizes, so they looked proportionate. Then I decided it looked a little plain, so I added 3 transferware dinner plates standing up along the back behind them. This gave a bit of a backdrop and broke up some of the white.
In some cases, I ended up switching things from one shelf to another, if it looked too much the same as the shelf above.
shelf two

On the second shelf, I started with an old mirror I had. I saw it sitting in my stash of home decor and thought it would be great to reflect light and add a little unexpected interest. Luckily, it fit perfectly!!
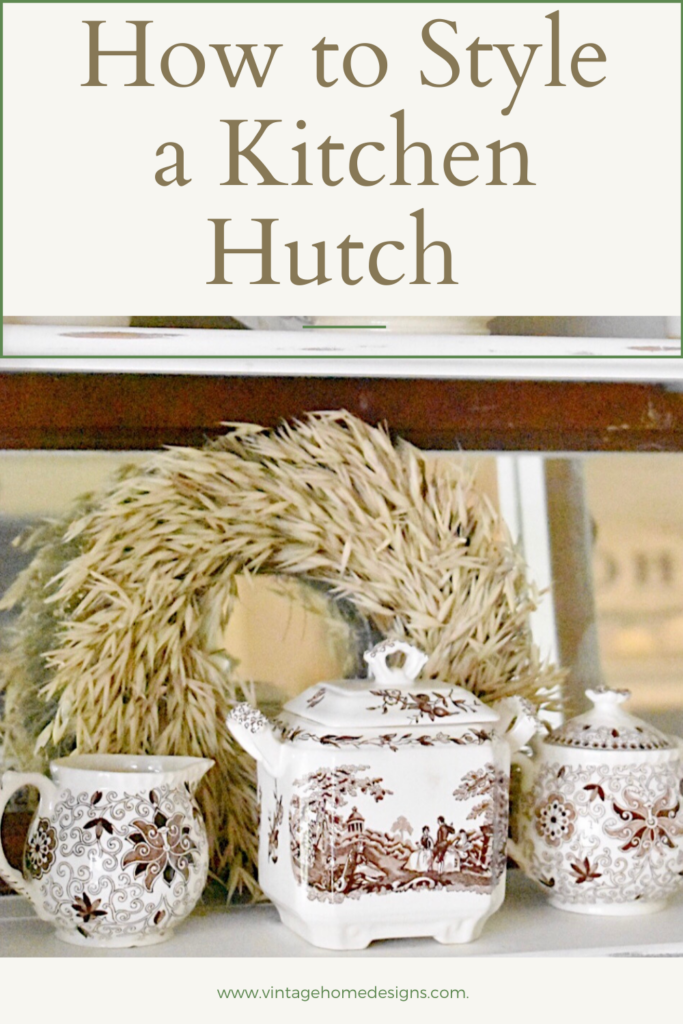
Since I was trying to display an entire set of dishes, I broke them up and added just a few to each shelf. For this shelf, I used a few salad plates, layered with some saucers, and topped off with a teacup. I did this on both ends, then used the creamer and sugar bowl from this set, plus a different size/shape sugar bowl from another set in the middle.
Finally, I added this wheat wreath for a finishing touch to this shelf.
shelf three

The third shelf was another example where I felt like it needed a backdrop, so I added a few of the oval plates from my ironstone collection along the back. Since I skipped a shelf and these are white, they didn’t compete with the transferware dinner plates I put along the back of the top shelf.
I used a couple of vintage books stacked in the middle as a platform for the gravy boat. This elevated it a little, and added interest.

Finally, I topped the teacups with a bleached pinecone, since I was styling for fall. And you can read all about how to bleach pinecones here.
shelf four
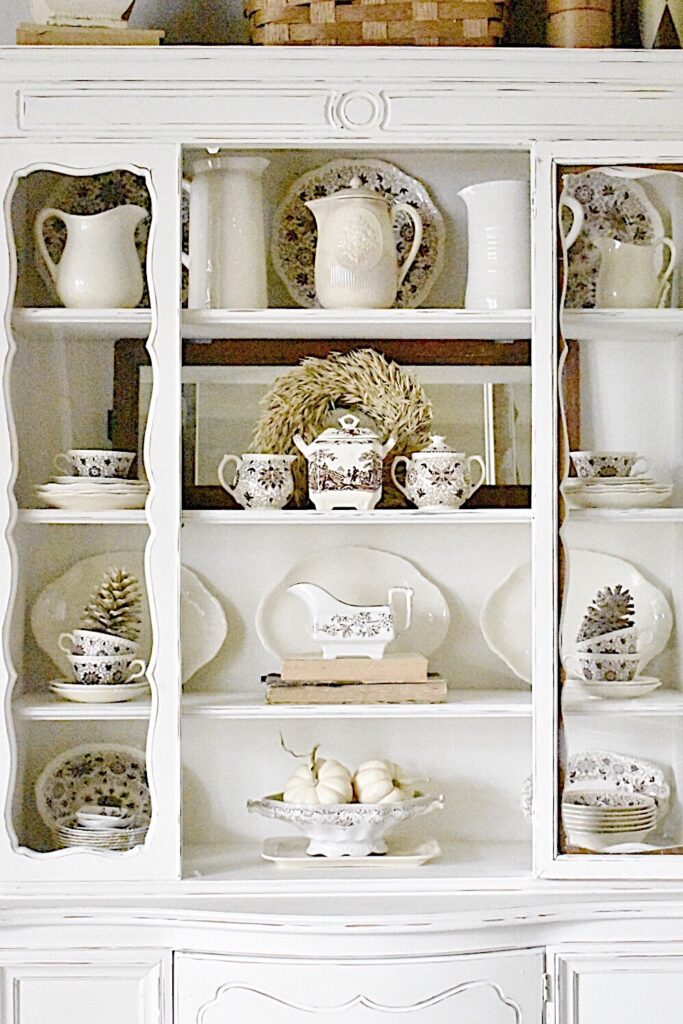
Lastly, the bottom shelf was the pieces of the collection I had left. I stacked the salad plates on one side and placed a small oval bowl behind them, and stacked the bowls on the other side with another serving piece behind them.
A rectangle tray from my ironstone collection, and a soup tureen from another pattern took center stage. I filled the tureen with white pumpkins, since it was fall.
Oh, and because I just love baby white pumpkins!

I love how it turned out and the brown transferware really warmed up the space for the season.
For Christmas, I will change the pinecones to small bottle brush Christmas trees and silver vintage Christmas ornaments will take the place of the tiny white pumpkins.
As for the top of the hutch, you’ll have to check back to see what I have planned for there!!
I hope you enjoyed this inspiration about how to style a kitchen hutch!
blessings,
michele
shop this post

If you enjoyed this post, you might like……
https://vintagehomedesigns.com/how-to-create-a-fall-tablescape/

If you enjoyed this post, Pin it to remember it…
This is great inspiration! Took a look at mine and realized it’s time for a fluff! thanks!
Oh good! I’m so glad it was helpful to you! Have a great Sunday!!
The hutch is absolutely gorgeous!! Where did you get it from?
It was an antique I picked up at a thrift store, then painted white. I’m so glad you like it and I appreciate the kind words.
Michele,
I love these ideas and can’t wait to share this on Tuesday.
Thanks so much Rachel! I appreciate being included in the kitchen idea share.
Your Hutch is so beautiful, Michelle! I love the way you styled it and I pinned it to my kitchen for to share 🙂 XOXO
Thanks so much! I really appreciate that and I’m so glad you found inspiration here.
Your shelf styling is perfect Michele. I love how you added the mirror and a few other items for a contrast and interest to the eye.
Thanks so much Wendy! So glad you liked it and I really appreciate the kind words.
That hutch is so gorgeous! I need to revamp mine after seeing your amazing ideas!
Thanks so much! So glad you liked it and found some inspiration.
Absolutely gorgeous! Everything that you touch turns out beautifully!
Thanks so much Renae! I really appreciate that.
Michele, it is gorgeous. I love how you used a long mirror in the back drop. It looks so beautiful with the dishes in front of it. Your brown transferware really pops in the cabinet. Stunning, my friend! I have a heart for brown transferware.
Thanks so much Tammy! I really appreciate that. Have a happy Easter!
Your hutch is so beautifully styled, Michele. You have inspired me to find some brown transferware like yours. Lovely job my friend.
Thanks so much Kim! I really love collecting it.
Michele im obsessed with your decor!
Aww, thanks so much Stacy! I really appreciate that. Have a wonderful Easter.